Thursday, October 20, 2011

I'm ba-a-a-a-ck....

Oh my goodness! I cannot believe it has been -gasp- SIX MONTHS since I last posted. Where in the heck did the time go? I can say, in all honesty, that my summer was insanely busy. My dear husband came home from Afghanistan in June and spent the entire summer...at home...with us. Yup. Many of you are probably thinking that I am not very nice, but it is a really difficult adjustment to have them back after being gone for 8 months. It was nearly an impossible adjustment to have him actually by my side for two straight months. But, we made it! Here's a little peak at the homecoming...
Cute, eh??

My crafting kind of took a backseat to family time for the summer, and although I missed it, I do not regret it for one second. I did miss my prime spray painting season, but have gotten into a few projects over the last few weeks...here is a sneak peek of some upcoming posts!

I don't know how I missed taking a before picture" but here is a sort of before...can't wait for you to see the transformation. I am in love and want to thank Rebecca over at you are talking too much for such an amazing inspiration.

I am also super tired of my coffee table in my sitting room, so I picked up this guy for $6 at the Arc and I cannot wait to show you what I am going to do with it!

That's all for now, but check back soon to see some great projects and some fun crafts!

Tuesday, April 19, 2011

Cute little Easter tees

I am all about holidays...love them. All of them. Well, except for Halloween...and I don't really know why, but I still go all out for it. As I was shopping around the last couple of weeks, I noticed that everything for Easter for kids is really girly...boys just don't have a lot of cute choices. With my little man's Easter parties (yes, more than one...I forgot about this possibility when they enrolled him in an advanced class in addition to his 3 y/o class!) coming up at the end of the week, I knew I had to make him something special. Here are 3 little tees I whipped up this afternoon - nothing like good ol' appliques!! I bought these applique patterns on etsy awhile back and found them today when I was looking in my stash. A quick perusal through my fabric scrap stash, some tees I had purchased when they were on sale at HL, and about an hour of my afternoon and I had these little guys!

Cute, cute!

Happy Easter!

Linking to I Made This! and House of Hepworths and I Made It Wednesday at Sweet Peas and Bumblebees and Show and Share at Just a Girl

Tuesday, March 29, 2011

Coffee Table Re-purpose

I have been looking for MONTHS for a new bench for my entry/living room area. I had a bench that came with me from my old house but, like soooo much of my other stuff, was just not quite right for the new space. No worries, though, she ended up in my master bedroom and looks just perfect...but more on that in another post! Anyhoo, the hunt for the perfect bench had been going on for quite some time when I stumbled upon this coffee table at the GW. I've seen some other coffee table renovations and thought I would give it a shot myself.

This has got to be the sturdiest table I have ever purchased! It is BIG and solid...the perfect base for a bench. It has great lines and perfect little details - and the best part of it?? $20 with two matching HUGE end tables!! The end tables are still stacked in my garage...not sure what I can do with them - but if all else fails they will go in my summer garage sale. I debated back and forth about painting it heirloom white as I did my chairs in my living room or painting it walnut brown like I did the accent table. I decided to go with the walnut, as I wanted to use the same fabric on the bench that I did on the chairs, but didn't want it to be totally matchy-matchy. I think the heirloom white would have shown the detailing better, but I am really pleased with the dark walnut. Plus, I am getting ready to change the railing for the stairs to white and since this bench sits against the stairs, I think the walnut will "pop" more.


What do you think??

I am linking up to Just a Girl SAS Day

Monday, March 28, 2011

Living Room Progress...

Wow! I didn't realize it had been so long since my last post...I guess I have been busier than I thought!

I thought I would share with you today, the culmination of a few different projects that are slowly coming together to form my formal living room. We've been in our house 9 months and I am slowly trying to make it all come together. Below is a picture of our LR, as it looked until about January - please try to look past my husband having a headstand contest with my niece! :)

You can see my little plaid sofa - with no legs - and my brown corner shelf. Both of these items made the move with us from Idaho - the corner shelf used to be red and the sofa used to have rockers. I was trying to decide if I wanted to keep it a rocker or turn it into something else. Below is a picture of my old great room, in my old house. It was perfect for there - but not wanting to keep the same color scheme (for a variety of reasons) - I needed to make some changes.
So, I painted the corner unit almost immediately after getting into the house and deciding where that monstrosity would fit! I added curtains to match the dining room - as they are connected and I wanted the open space to flow as much as possible. You can see some of revisions to the dining room on an earlier post here. I wanted the same bright look for the living room. I had redone a chair (shown here ) and had found another that was similar and I redid that one the same way. The before on the second one was not nearly as hideous as the first - but I still wanted a "matching" set. I spent $14 on this chair a few months ago at the Arc.

Here's the before:

And the after...

I was really drawn to the caning on these chairs, so imagine my excitement when I found this at Goodwill for $5!! Look at that beautiful caning on the bottom - and what a great shape for an accent table! I was IN LOVE. I am so seeing this piece in the same dark brown as the corner unit.

Lastly...remember my plaid sofa? Remember my friend Rainee who helped me recover that little number for my office? Put 'em together and I have this! We recovered the sofa with a golden/tan corduroy! (Oh, and see that little lamp there on the side? That was a $2 GW find - a basic brassy floor lamp that got a couple coats of ORB and is good to go! Still trying to figure out if I am going to make a different shade or not...)

So...without any further delay...here is the progress I have made on my living room...with my pals staged in (yeah right) for the big photo shoot.

Would love your feedback!!

I am linking to The Shabby Nest and Shabby Chic Cottage

Friday, February 25, 2011

Love Seat Redo!

*Disclaimer! Please forgive my horrible picture quality...my beautiful Nikon had a run-in with my beautiful three year old and the outcome was a definitely a victory for my little man...so in the meantime, I am using my old point and shoot.*

Okay, so I wasn't quite ready to do this post, as I wanted to get my entire office finished first, but since that might NEVER happen, I decided to go ahead and show my latest project!! I am so mad at myself that I never took a picture of this beauty in all of its avocado green and burnt orange cushioned glory, but I couldn't bear to bring those old dirty cushions into my home...yep, they were bad. So here is a picture of the before of the frame...well, sort of...I had already done the cleaning and started priming before I remembered to take a picture!
What a great piece she is!! Perfect curvy, feminine lines and in great, solid shape! But yikes! Don't look at the background of the picture - as you can see my unfurnished living room has become a mini workshop in this bitter Wyoming winter...the garage is too darn cold!

I did end up having to bring in the cushions so that I could measure them for the new covers, and I am glad I did. Underneath the dirty (but very well made) exterior were fully lined cushions in PERFECT condition!! I am so glad that I didn't have to replace the foam, as I was expecting.

I have to admit that this project was a big learning experience for me...I worked on it with my good friend Rainee and she showed me a million new techniques that are really going to help not only my sewing, but all of my DIY projects! I can't thank her enough for her guidance and wisdom and masterful sewing ability!!

Okay...here is my girl! Isn't she beautiful?! Living in a house of guys doesn't afford me many opportunities for bright and girly pieces...but this one is going in my space and she is all mine!

I am linking to Show and Share Day at Just a Girl and Saturday Swagger at It's a Crafty Life

Wednesday, February 16, 2011

Stylish Blogger Award!

Oh my gosh! A HUGE thank you to Nicole at Black Cab Designs for nominating ME for the Stylish Blogger Award! As an avid follower of her blog, this is really exciting for me! Thanks so much Nicole, you totally made my day and motivated me to get some more of my projects blogged!


There are rules that go along with receiving this award...and they are as follows:
1. Thanks and link back to the person who awarded you this award.
2. Share 7 things about yourself.
3. Award 15 recently discovered great bloggers.
4. Contact these bloggers and tell them about the award!

Okay...so here goes...

1. I am a military wife of almost 10 years to an amazing man...a Master Sergeant Explosive Ordnance Disposal Technician (EOD) with the Air Force.


I have two awesome sons - 6 and 3 - who keep me on my toes all the time!

3. Photography is my true love of a hobby. I have a camera with me all the time...

4. I love to plan parties and have a tendency to go way over the top when I am doing one...regardless of who or what it is for.


5. I've been crafting for a long time, but can't seem to focus on one craft or "talent"...I like to try it all and usually have about 10 different projects in 10 different mediums going on all the time.


6. I recently started running and am training for a half marathon in June. I know people say that running is therapeutic and gives them a high, but I truly hate it. I am doing it to prove to myself that I can, but I have yet to find one step of enjoyment in it! :)
7. My favorite foods are spaghetti and meatballs and mashed potatoes and gravy. I would love to eat them together as a meal.

That's it!! Thanks again to Nicole...Now I have some blog perusing to do so I can find my own nominees!!

Thursday, February 3, 2011

Wall Art...sort of!

Another day, another project finished...well, that isn't exactly how it goes around here, but here is a quick little project I whipped up after staring at a huge blank space in my dining room for 6 months. My dear friend Brooke, visited me not long ago and told me that I really needed a big, bold piece for that wall. I sheepishly told her I had found one that I loved, but wasn't quite willing to spend the $149 on it. We talked about it and by the time she left, I knew I was heading back to TJ Maxx the next day to get my canvas. Fast forward to the next day...I was SO excited as I raced to TJM's and lo and behold my the canvas was GONE. I was so sad and was just positive I would never find anything to fill the empty void in my soul on my wall. As I was doing some ironing in my guest room, I happened to glance upon the fabric covered canvases that I had made for some eye candy in that room...and I figured, why not? Why not do the same idea in my dining room? It could be a fun piece that I could have until I really found what was supposed to go on that wall. So, the next day I went shopping for a large canvas...and I found them at HL for $50. Hmmm. I really didn't want to spend $50 on a canvas that I was going to cover up. So I decided to build my own canvas frame. Off to the big orange store...where I picked up the pieces I would need for the bargain basement price of...$1.40. It was only on my way home that I remembered the table cloth...no, I am not off topic here. I had purchased a table cloth from Target a few weeks earlier because I liked it...and because it was on sale. I don't use table cloths on my tables, but for some reason this one spoke to me and begged to be put into my cart. I knew that this cloth would be the perfect piece to make my wall art from. Take a look!

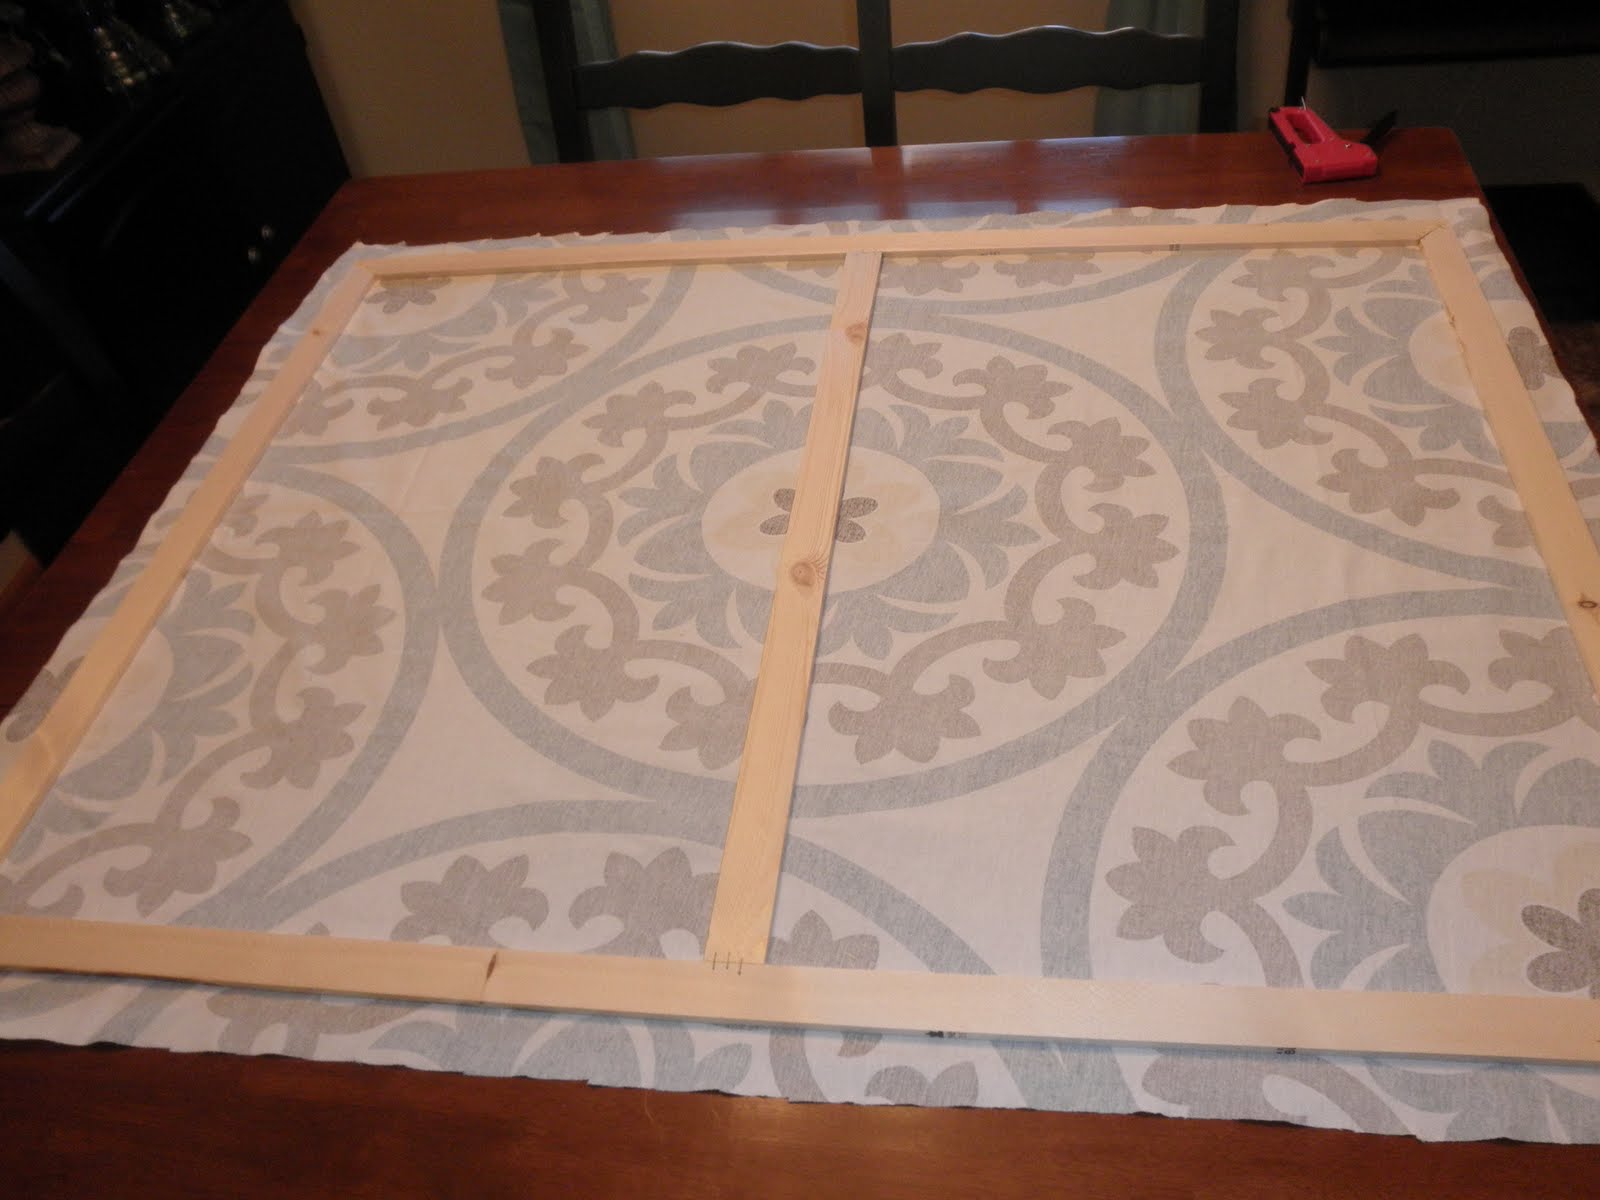
First, I built the frame...I made this frame 36x48 - I used some 1/2" lath, mitred the corners, fit them together, glued the joints and then stapled it all together.


Since my table cloth was round, I cut it into a rectangle (so that I wouldn't have as much excess on the back) and laid my frame on top of it. Given that the fabric was white, I was easily able to see the pattern through the wrong side, making it easy to line up the frame exactly where I wanted it placed on the fabric.


Then I started stapling. I worked at one end, making sure it was stapled tightly before moving to the other end and stretching the fabric as tightly as I could without making wrinkles. I did the same thing on the other two sides. Then I put up some nails using my handy laser level and hung it up on the wall. It is so light that I there was no need for hangers on the back of the frame...the frame itself sits on top of the nails in the wall.

I think it is beautiful! It really made my dining room pop!

It was only after hanging this fun piece on the wall, did I actually look around my dining room. It really wasn't working for me. Brooke had told me that she thought my ladder shelves needed to anchor the window, but I was adamant that I couldn't fit the china hutch in the room (due to a light switch) if the shelves were both on the window wall. So I had the disjunctive look of one shelf on the wall, one by the window, the china hutch jammed in the corner and my big square table taking up all the rest of the space. I knew it was time for a change. So, I took the leaf out of the table, reducing the size by about 20 inches. I don't use it often enough that putting the leaf in will be any great chore. Then I moved the china hutch out of its corner and moved the other ladder shelf to the window wall. Brooke was right...they needed to be together. But WHAT was I going to do with my china hutch? It was just too tall to sit on the one wall. Hmmmm...so I took it apart. I used the lower buffet part to anchor the wall with the new canvas and used the hutch as a shelf on the other wall...which was a last minute decision and is not shown in the picture below. I cannot believe how much it opened up the room and gave it a modern and classy feel!

">I am linking to :


Thanks for checking me out!

Monday, January 24, 2011

Another Chair Makeover!!

Okay - so I am really excited to share this chair makeover for a couple of reason...1. I didn't think I could do it and 2. I picked this little sucker up for $3! Here she is in almost all of her original glory ( I told you I am not used to taking pictures at each step - I get too excited!)...she had a cushion and the trim was attached prior to taking this picture!

So with the assistance of my dear friend, Nikki, we stripped her down to her frame...the chair, not Nikki :)...which took about FOREVER...this little baby was a well made piece! I bet I pulled 500 staples out of her!

Then I took her into the garage and gave her a good cleaning, a coat of primer and two coats of paint - Rustoleum in Heirloom White - which is just the perfect off white.

As you can see from her before picture, she had a tufted back, which I have never attempted to do before and which two of my friends attempted to talk me out of trying, but I was determined to give this little gal something of her past to hold onto...err....I just really wanted to tuft it! So I did...which was a little harder than I thought. I ended up having to reuse the covered buttons that held the tufting in the original piece, because they had the sturdiest, best, prong back fasteners that I have ever seen...and I couldn't find them anywhere to buy...ugh. So what I did was use the old (ugly) button fasteners to tuft through the foam and batting...

And then I attached my super cute brown covered buttons to the fabric and pulled my thread through to the back and tied it off to the prong fasteners! Professional? Heck no! Functional? Heck Yes!
So, after I got all the tufting done, I started stapling the fabric back into the frame and when I had it tight and pretty much how I wanted it, I started stapling the trim into the frame. I will admit that I bought the wrong trim. I bought the kind that is supposed to be sewn under the fabric instead of just the rope trim...so after I had the edge stapled into the frame, I went back and glued the trim down onto its edge, so that it would be tight. It still looks great - just cost me an extra step. I didn't take a picture of this...sorry!

So here she is...in her revamped glory...love it and can't wait to get her mate done so that my living room can stop looking like a workshop!!

Sunday, January 9, 2011

Chair Redo

So, as you may know my handsome husband is deployed to Afghanistan right now, which really is nothing new, but it is the first time I have ever been a stay at home mom (not by choice) while he is gone. I am going CRAZY! It's not that I don't love being able to spend time with my boys, but I am a WORKER. I thrive on being insanely busy - which is what life with a full time job, two little boys and a deployed husband makes you. And crazy. :) So anyway - on this deployment I decided I need a new hobby. I thought that thrifting and redo-ing furniture for our new home sounded like just the thing for me. I had been searching for furniture for our guest room - I just wasn't into spending a ton of cash on furniture that 1. didn't really like and 2. was just like what everyone else had. So I talked with my dear friend, Brooke, who is a Home Refiner and told her what I was looking for and what I wanted to do. All I can tell you, thus far, is that I furnished my guest room (not including the mattress and box spring) for $29. Yep. TWENTY NINE DOLLARS!! I was almost doing cartwheels after shopping for a couple hours with Brooke! Of course, it means a lot of time - but time is all I've got until summer! The best part (as you will soon see) is that all of these projects help to make the new house OURS! Can't wait to get them all blogged!!

So this little gem was purchased at the Arc for a bargain basement price of...$4.99!!! I admit I had already done some sanding when I took this first picture - I am a little impatient and not used to documenting each step of my activity!!

So I took her apart, removed the hideous vinyl cushion,sanded her completely down, filled in a few cracks with my trusty wood filler and primed her. I used a spray primer - I believe it was a Valspar spray primer, in white, obviously.

I let the primer dry for several hours and then was ready to paint. This is also spray painted, with Rustoleum's High Gloss Black.
I had found the perfect bedding for my guest room at TJ Maxx (my FAVORITE store!) - it's a beautiful soft gray with ruffles by Cynthia Rowley - LOVE IT! But, it is pretty neutral, so I knew I had to do something with a little bit of pop for the cushion. I happened to be in Hobby Lobby (shocker) and found a super cute - very retro, but modern fabric that I thought would be perfect. I love how this chair came out!!

Monday, January 3, 2011

Fireplace...

When I first moved into my new house, I was really excited because I thought everything was a very neutral off white-ish color...boy was I wrong. Sure, it was off white TINTED WITH PEACH! UGGGHHHHH...Hideous is the only word I can describe it with. I don't know how I missed that. Maybe because EVERY PAINTED SURFACE in the entire house was the same...thus, making me feel comfortable. But, once I got my stuff in, I KNEW the paint had to go. And fast. So WE painted...a nice warm, cafe au lait...that looked...PEACHY!! So, I (not we, this time!) painted again. Finally. Sigh. Relief. Happiness. Then I started in the trim, sills, etc. to make them fresh and clean. One room at a time, I am gettin' it done. But, there was that pesky fireplace...with its peach tile and brassy finish. Yuck. Somehow, 3 days before the husband took off for Afghanistan, I convinced him it was a good idea to do a little fireplace makeover.

This picture doesn't quite do it justice, though, because it already has the brassy nastiness off and the surround as been painted white to freshen the varnish-y oak that was there.

So, we smashed out the old tile...

Replaced it with some great, tiny, tiles that were different shades of cream and brown...

Cleaned the old brass with rubbing alcohol and finished it with a high heat spray paint and TA DA!!! New fireplace and very happy wife!

All in all it cost us $68 and about 5 hours of total labor!

A Look Back...


As we start 2011, I decided to say a firm goodbye to 2010 (not my best year...) but trying to find some of the GREAT things about it...um...can't come up with a whole lot! Not going to lie, 2010 was TOUGH on this girl! It started right away with saying goodbye to my hubby - after only 6 weeks of being together at the end of 2009. Ugh. He moved to Cheyenne in January - leaving the kiddos, dogs and I behind to get through the school year and get the house sold. Fast forward to June - school is out and the house is STILL not sold - WHAT DO WE DO NOW??? Well, we decided to suck it up, take the big plunge and MOVE! So we did...got a new house and left the old one behind with the old life. :(

The day after the movers finished packing up the old house, I got a phone call from my sister who informed me that my mom was very sick. So, I headed to Wyoming to meet up with my husband, closed on the new house, moved the boxes into said house, slept (very little) and headed across the country to NY to help my family. After being in NY for a month - I HAD to get back to Wyoming to start my new life. The day after I got home, my husband headed out for 2 months for training/schooling/BS... whatever you want to call it. So, the boys and I did our best to settle in and get acquainted with a new city. My dear husband got back from his training and I made the mistake of taking a little sigh of relief. Silly girl...I should have known better!! We no sooner got his bags unpacked when he got a call for a short tasking deployment leaving in...TWO WEEKS!! That's right...headed to Afghanistan until June-ish. I swear I live my life in "ish's". But, I am nothing if not resilient. We just have to deal with these things and do our best to take them in stride. So, I ended my 2010 celebrating to the best of my ability with my kids...it wasn't the first time, and I am positive it won't be the last. But hey, looking back at some of these pictures, it looks like we created a few special memories even through all the pain.